Sunday, October 10, 2010

acorn squash with apples

With the recent influx of hard squash over the last few weeks, I've once again found myself faced with a food I've never cooked with. Fortunately, I've had several successful experiments, the first of which coming from my good friend Natalie, who once again dropped an awesome suggestion for a recipe. I made this without any modifications from the Mayo Clinic formula as breakfast over the weekend:

  • 1 Granny Smith apple, peeled, cored and sliced
  • 2 tablespoons brown sugar
  • 1 small acorn squash, about 6 inches in diameter
  • 2 teaspoons trans-free margarine

In a small bowl, mix together the apple and brown sugar. Set aside.

Pierce the squash several times with a sharp knife to let the steam escape during cooking. Microwave on high until tender, about 5 minutes. Turn the squash after 3 minutes to ensure even cooking.

Place the squash on a cutting board and cut in half. Scrape the seeds out of the center of each half and discard the seeds. Fill the hollowed squash with the apple mixture.

Return the squash to the microwave and cook until the apples are softened, about 2 minutes.

Transfer the squash to a serving dish. Top each half with 1 teaspoon margarine and serve immediately.

This was a great main breakfast course, topped off with toast and cheese that also came to us from Breezy Willow. The sweetness of the apple mixture was a good counterpoint to the nutty acorn squashflesh, and the textures were very complimentary. Should any acorn squash further wander into my possession, I'll be doing this one again.

Monday, September 6, 2010

Pizza!

One of my very favorite things in the world is pizza. This weekend I treated myself (and my neighbors) to some pizza using toppings from this week's CSA share.

Pizza #1: tomato sauce, fresh mozzarella (from B.W.), and basil (from our backyard).


Pizza #2: sauteed swiss chard and onion, fresh mozzarella

Carne Asada Tacos

Original recipe here

Our version (trying to avoid the grocery store) below:

Ingredients
* 2 pounds beef cubes from B.W.
* 3 tablespoons white vinegar
* 1/4 cup soy sauce
* 2-1/2 cloves garlic, minced
* 1-1/4 limes, juiced
* 1/4 cup olive oil
* 1/2 teaspoon salt
* 1/2 teaspoon ground black pepper
* 1/2 teaspoon ground white pepper
* 1/2 teaspoon garlic powder
* 1/2 teaspoon chili powder
* 1/2 teaspoon dried oregano
* 1/2 teaspoon ground cumin
* 1/2 teaspoon paprika

* 3/4 white onion, chopped
* 1/4 cup chopped fresh cilantro
* 1 lime, juiced

* 1-1/2 large tomatoes, chopped
* 1-1/2 jalapeno peppers, chopped
* 1 white onion, quartered
* 2 cloves garlic, peeled
* salt and pepper to taste

* 1 package corn tortillas
* 2 cups crumbled Mexican white cheese (optional)
* 1 lime, cut into wedges


Directions
1. Lay the beef cubes in a large glass baking dish. In a medium bowl, whisk together the vinegar, soy sauce, garlic, lime juice, and olive oil. Season with salt, black pepper, white pepper, garlic powder, chili powder, oregano, cumin and paprika. Whisk until well blended, then pour over the steak in the dish. Turn over once to coat both sides. Cover with plastic wrap, and marinate for at least one hour.
2. In a small bowl, stir together chopped white onion, cilantro, and the lime juice. Set aside to use as a relish for the tacos.
3. Place the tomatoes, onion, jalapenos, and garlic onto a baking sheet. Roast in the oven for about 20 minutes at 450 degrees, until toasted but not burnt. Place the roasted vegetables into a blender or food processor, along with salt and pepper. Puree until smooth.
4. Heat vegetable oil in a large skillet over medium-high heat. Cook marinated beef cubes, stirring regularly, until the meat is cooked through and most of the liquid has evaporated.
5. Warm the tortillas in a skillet for about a minute on each side to make them pliable. Arrange two or three tortillas on a plate, and lay a generous amount of beef over them. Top with a sprinkle of the onion relish and a large spoonful of the pureed salsa. Add as much cheese as you like. Garnish with lime wedges, and serve.

Sorry, no picture. We were starving and forgot to document this one. Here's a photo from Melissa @ AllRecipes.


MelissaJean. Taqueria Style Tacos - Carne Asada. February 3, 2006. AllRecipes. Web. September 6, 2010.

Thursday, August 26, 2010

Two Excellent Kale Suggestions

A few years ago I had never even eaten it, but kale has become one of the items that Katie and I really look forward to in the summer. These two recipes are some of our favorite ways to use kale.

Caldo Verde

Ingredients

* 4 tablespoons olive oil, divided
* 1 onion, minced
* 1 clove garlic, minced
* 6 potatoes, peeled and thinly sliced
* 2 quarts fresh veggie stock
* 6 ounces linguica sausage, thinly sliced (any sausage will work)
* 2 1/2 teaspoons salt
* ground black pepper to taste
* 1 pound kale, rinsed and julienned

Directions

1. In a large saucepan over medium heat, cook onion and garlic in 3 tablespoons olive oil for 3 minutes. Stir in potatoes and cook, stirring constantly, 3 minutes more. Pour in stock, bring to a boil, and let boil gently for 20 minutes, until potatoes are soft.
2. Meanwhile, in a large skillet over medium-low heat, cook sausage until it has released most of its fat, 10 minutes. Drain.
3. Mash potatoes or puree the potato mixture with an immersion blender or food processor. Stir the sausage, salt and pepper into the soup and return to medium heat. Cover and simmer 5 minutes.
4. Just before serving, stir kale into soup and simmer, 5 minutes, until kale is tender and jade green. Stir in the remaining tablespoon of olive oil and serve at once.


Baked Kale Chips

Ingredients

* 1 bunch kale
* 1 tablespoon olive oil
* 1 teaspoon seasoned salt

Directions

1. Preheat an oven to 350 degrees F (175 degrees C). Line a non insulated cookie sheet with parchment paper.
2. With a knife or kitchen shears carefully remove the leaves from the thick stems and tear into bite size pieces. Wash and thoroughly dry kale with a salad spinner. Drizzle kale with olive oil and sprinkle with seasoning salt.
3. Bake until the edges brown but are not burnt, 10 to 15 minutes.


Don't forget that the Breezy Willow site has hundreds of recipe ideas using items from our shares, too. Check the BW link on the right hand side of this page.

Wednesday, August 18, 2010

corn chowder with roasted poblanos

Upon seeing that we had been granted the boon of fresh corn a few weeks back, my good friend Natalie suggested this recipe for corn chowder from the Mayo Clinic. I then made it with a few modifications, and it was good. Damn good.

  • 2 poblano or Anaheim chilies, halved lengthwise and seeded (I picked up 2 poblanos for this)
  • 2 or 3 Yukon gold or red-skinned potatoes, about 1 pound total weight, peeled and cut into 1 1/2-inch chunks (I used 1 pound of mixed potatoes from my share)
  • 2 tablespoons olive oil
  • 1 small yellow onion, chopped
  • 1/4 cup diced celery
  • 1/2 red bell pepper (capsicum), seeded and diced (as Laura loathes bell peppers, I substituted a banana pepper instead)
  • 1/2 teaspoon salt
  • 2 1/2 cups fresh corn kernels (cut from about 4 ears corn) or frozen corn kernels, thawed
  • 2 cups vegetable stock or broth
  • 1 cup 1 percent low-fat milk
  • 1/4 teaspoon freshly ground black pepper
  • 2 tablespoons chopped fresh cilantro (fresh coriander)
  • 2 teaspoons chopped fresh oregano or 1/2 teaspoon dried oregano

Preheat a gas grill or broiler (grill). Position the cooking rack 4 to 6 inches from the heat source.

Arrange the chilies skin-side down on the grill rack, or skin-side up on a broiler pan lined with aluminum foil. Grill or broil until the skins begin to blacken, 5 to 7 minutes. Transfer to a bowl, cover with plastic wrap and let steam until the skins loosen, about 10 minutes. Peel the chilies, discarding the blackened skin, and chop coarsely. Set aside.

Put the potatoes in a saucepan, add water to cover, and bring to a boil over high heat. Reduce the heat to medium and cook, uncovered, until the potatoes are tender, 15 to 20 minutes. Drain and transfer to a small bowl. With a potato masher, partially mash the potatoes and set aside.

In a large saucepan, heat the olive oil over medium heat. Add the onion, celery and bell pepper and saute until the vegetables are softened, about 5 minutes. Stir in 1/4 teaspoon of the salt and cook for 3 to 4 minutes longer. Stir in the roasted chilies and the partially mashed potatoes. Add the corn, vegetable stock, milk, pepper and the remaining 1/4 teaspoon salt. Simmer uncovered until the soup thickens, 25 to 30 minutes.

Ladle into warmed bowls and sprinkle with the cilantro and oregano. Serve immediately.

This was simply spectacular - hearty and flavorful. The substitution of the banana pepper for the bell variety certainly amped up the spice level, but it wasn't overwhelming. I will definitely keep this in my rotation of dishes to do when corn is plentiful.

Saturday, August 14, 2010

Pasta with Baked Eggplant


The foundation for this meal came from this recipe at AllRecipes. We didn't have all of the specified ingredients, but thought we could experiment, so here's our modified version:

Ingredients

* 1 eggplant, peeled and sliced
* 2 eggs
* 1 tablespoon water
* 1 cup dry bread crumbs
* 2 tomatoes, chopped
* 1 onion, chopped
* 1 clove garlic, finely chopped
* 1 handful of fresh basil
* olive oil
* balsamic vinegar
* fresh mozzarella
* cooked pasta

Directions

1. Preheat oven to 375 degrees F. Grease a baking sheet or pizza pan with olive oil.
2. Slice the eggplant slices 1/4 to 1/2 inch thick. Trim the skin, maintaining the round shape of the slices. In a small bowl, whip together the egg and water. Place the breadcrumbs in a separate small bowl.
3. Dip the eggplant slices one at a time into the egg and water mixture, then into the breadcrumbs. One by one, place the coated slices in a single layer on the prepared baking sheet or pizza pan.
4. Bake in the preheated oven approximately 15 minutes. Change oven setting to broil, and continue cooking 3 to 5 minutes. Check the slices frequently while broiling to avoid burning.
5. While eggplant is baking, cook pasta of your choice.
6. Combine tomato, onion, garlic, and basil in a bowl. Add salt, olive oil, and balsamic vinegar to taste (probably only a splash of each).
7. For serving, place two roasted eggplant slices over pasta. Top with tomato mixture and fresh mozzarella cheese.

Friday, August 13, 2010

Brother Ilchester's Summer Highball

Brother Ilchester's Summer Highball, cc by-nc-sa image from John Cmar on Flickr

The past few weeks have seen a robust crop of peaches and nectarines from our CSA shares. In pondering the latest fruits, and what to do with a forlorn bottle of triple sec, I came up with the following refreshing concoction:


Pit and slice the fruit. Place slices on a paper towel, and freeze for approximately 60 minutes. Mix triple sec, gin, and tonic water over the frozen fruit instead of ice.

This turned out quite well, and perfect for the ridiculously hot and humid weather of late. Having the cool fruit to munch on toward the end of the drink was wonderful.

Wednesday, August 11, 2010

More Fruit Goodness

Watermelon Salsa
Last weeks' watermelon was enormous. And after having two sharing parties with our neighbors and our family, we still had 1/4 watermelon left. Casey has sent the e-mail with a watermelon salsa recipe and that sounded pretty great. I didn't use that recipe, however, but I liked the idea. I prepped everything we had in our kitchen as if I were making regular salsa, substituting watermelon in place of tomatoes.


I diced and seeded the remaining watermelon and added onion, jalapeno, and cilantro to taste. Excellent.

Tennessee Peach
We also wanted to use a few peaches that were perfectly ripe. We found this recipe for a Tennessee Peach online. As with most recipes, we used it more as a jumping off point rather than a strict set of directions.

Ingredients:

3-4 fresh peaches
1 fresh lime
3 shots of whiskey
1-2 tbsp. simple sugar syrup
ice

Directions:

Peel peaches and puree in a blender. Transfer to a separate bowl and rinse blender.
Combine 5 oz. peach puree, 3 shots whiskey, juice of one lime, and one glass of ice.
Add simple syrup to taste (we used brown sugar syrup, which was AWESOME!)
Makes two servings.

Tuesday, August 10, 2010

Creamy Fruit Salad

Finding myself with a wondrous surplus of fruit in our recent CSA shares, I heavily adapted this recipe for creamy fruit salad as a fruit-based side dish. As usual, my goal is use as much of the share food as possible, without adding in other produce unless truly necessary. I used:


  • 4 peaches, diced and pits removed

  • 4 nectarines, diced and pits removed

  • 8 Methley plums, diced and pits removed

  • 2 cups blueberries

  • 1/4 cup trail mix

  • 1 (1 1/2 ounce) box sugar-free instant vanilla pudding mix

  • 1/3 cup sweetened lime juice

  • 2/3 cup water

    Combine the peaches, nectarines, plums, blueberries and trail mix in a large mixing bowl. In small mixing bowl, combine pudding mix, water and lime juice with a wire whisk until smooth. Add pudding mixture to fruit. Mix gently until thoroughly coated. Refrigerate until ready to serve.

    This was incredibly easy and quick to make, and the result was quite tasty. The lime juice added a strong flavor base.
  • Thursday, August 5, 2010

    Veggie Broth

    Do you find yourself throwing away tons of vegetable scraps after cooking with all of your awesome CSA produce? Before you throw your veggie cuttings into the compost heap or the trash can, you can squeeze a little more life out of them by making your own broth. You can use the broth as a replacement for any water requirements, i.e. cooking rice. Risotto and soups also require broth.

    A quick Google search will show you any number of recipes and techniques, as well as opinions as to what should or should not be included. Many people like to use whole vegetables. I tend to think that would be expensive and wasteful considering the amount of edible scraps we have after cooking. Many others have recipes with very specific combinations and amounts. This seems like too much work and thought.

    As far as what veggies to use and which to avoid, our experience is that most veggies that you like to eat will be a great addition to your stock. Our favorites include: Potatoes, onions, garlic, turnips, parsnips, squash, peppers, carrots, celery, and herbs.

    Some problem veggies include: Tomatoes, cucumbers, beets, broccoli, asparagus, and cilantro. These are delicious to eat, but they end of getting slimy and gross or their flavors dominate the broth.

    Because we don't use a regular recipe our stock tastes different every time. We're ok with that, but if you want something more consistent you may consider sticking to a recipe of your liking.

    First, you need to collect veggie scraps over a few days. We use a plastic storage container and keep it in the fridge.


    When the container is full, or when you anticipate needing broth, put all scraps into a large pot and fill with water.


    Bring water to a boil and let it simmer for 45 minutes to 1 hour. It's not the most appetizing thing to look at, but it will make your home smell fantastic.


    Pour the liquid through a large colander into another large pot or bowl to collect the broth and separate the scraps.


    Strain broth into a storage container for use later. We use an old pitcher and often save some in the freezer.


    You can use it immediately or store it for a week or two in the fridge. A simple sniff test will tell you if it has gone sour (it will be obvious). The frozen cubes seem to last a very long time and we use them if we're caught without fresh stock.

    Wednesday, July 28, 2010

    Breezy Willow Meats!

    Did you know that Breezy Willow also sells fresh, local meat? Depending on availability, Breezy Willow offers locally raised, grass fed beef, pork, chicken, and lamb. You can browse the selection at their website, or contact RJ to make a request. If you purchase through the website, we can deliver it to BBMS on Thursdays along with the regularly scheduled pickup. You can pay at that time and ignore the shipping fee. Here are two meals Katie and I have made recently using meat from Breezy Willow.

    Orange Pork Chops

    This recipe (and all preparation) was courtesy of Katie's Mom, Nanci, who was visiting us at the time. I didn't know this until I looked it up, but a capital T stands for tablespoon, while a lower case t stands for teaspoon.

    4 center cut pork chops
    salt, pepper, paprika
    2 T. oil
    10 whole cloves
    2 T. grated orange rind
    2 T. cornstarch
    2 c. orange juice
    1/2 c. sugar
    2 t. cinnamon
    1/4 t. salt
    2 whole navel oranges, sliced thin for garnish
    rice (prepare as directed)

    Season pork chops on both sides with salt, pepper, and paprika. Brown chops in hot oil in skillet. Once they are browned, cover bottom of skillet with water (do not completely cover chops), turn down heat, and cover skillet. Simmer till tender, (about an hour or so), adding water as it cooks away. Turn chops as needed. Meanwhile, prepare orange sauce and rice.

    Orange Sauce:
    In a saucepan, cook sugar, cornstarch, salt, cinnamon, cloves, orange juice and rind. Cook over medium heat until thickened. (if it does not thicken enough, mix 1 more tablespoon cornstarrch with a little bit of water then stir into sauce) Transfer chops to serving platter. Pour sauce over chops and rice. Garnish with orange slices.


    Ropa Vieja (Braised Beef, Peppers, and Onions)

    This recipe came from The Gourmet Cookbook, but can also be found online at Epicurious.com. p.s. Epicurious is an excellent resource for recipes!!

    Ingredients

    For braising beef:

    * 3 pounds skirt or flank steak, trimmed (we used beef cubes from B.W.)
    * 2 quarts water
    * 2 carrots, chopped coarse
    * 1 large onion, chopped coarse
    * 2 celery ribs, chopped coarse
    * 1 bay leaf
    * 3 garlic cloves, crushed lightly
    * 1 teaspoon dried oregano
    * 1 teaspoon ground cumin
    * 1 teaspoon salt
    * 1/4 teaspoon whole black peppercorns

    we skipped the carrots and celery as we did not have them and they were only used for flavoring the stock.

    * 2 green bell peppers, cut into 1/4-inch strips
    * 1 red onion, cut into 1/4-inch strips
    * 4 tablespoons olive oil
    * 2 cups braising liquid plus additional if desired
    * a 14- to 16-ounce can whole tomatoes with juice, chopped (we used Ro*tel)
    * 3 tablespoons tomato paste
    * 3 garlic cloves, minced
    * 1 teaspoon ground cumin
    * 1/4 teaspoon dried oregano
    * 2 red bell peppers, cut into 1/4 inch strips
    * 2 yellow bell peppers, cut into 1/4 inch strips
    * 1 cup peas
    * 1/2 cup pimiento-stuffed Spanish olive, drained and halved

    (we subbed green peppers for 1 red and 1 yellow as we had several from B.W.)

    Preparation

    To braise beef:
    In a 5-quart kettle combine all braising ingredients and simmer, uncovered, 1 1/2 hours, or until beef is tender. Remove kettle from heat and cool meat in liquid 30 minutes. Transfer meat to a platter and cover. Strain braising liquid through a colander, pressing on solids, into a bowl. Return braising liquid to kettle and boil until reduced to 3 cups, about 30 minutes. Stew may be made up to this point 1 day ahead. Cool braising liquid completely and chill it and the beef separately, covered.

    In kettle cook green bell peppers and onion in 2 tablespoons oil over moderate heat, stirring, until softened.

    While vegetables are cooking, pull meat into shreds about 3 by 1/2 inches. To onion mixture add shredded meat, 2 cups braising liquid, tomatoes with juice, tomato paste, garlic, cumin, oregano, and salt and pepper to taste and simmer, uncovered, 20 minutes.

    While stew is simmering, in a large skillet cook red and yellow bell peppers in remaining 2 tablespoons oil over moderate heat, stirring occasionally, until softened. Stir peppers into stew with enough additional braising liquid to thin to desired consistency and simmer, uncovered, 5 minutes. Stir in peas and olives and simmer, uncovered, 5 minutes.

    Serve ropa vieja with yellow rice.

    Tuesday, July 27, 2010

    the Ultimate (and Epic Ultimate) Bell Pepper Cocktail

    Last week's share gave us a selection of lovely bell peppers, which us a problem: Laura detests the bell pepper, both in taste and texture. While it's not among my favorite vegetables, I am not offended by it's inclusion in various foodstuffs. Instead of trading our peppers out for something else, I took this as a challenge to do something deliciously different with what I affectionately refer to as God's Filler Vegetable. (Seriously, it's in just about every frozen or easily prepared dish that includes some sort of "vegetable mix.") Giving this a bit of thought, I came to an obvious conclusion:

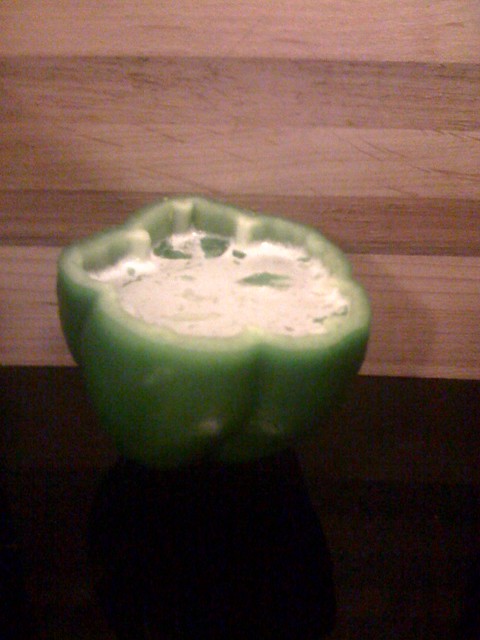
    The bell pepper must be taken roughly by alcohol in a shadowy bedroom and spit forth delicious progeny as a result.

    I wasn't sure what form this would take. My first inclination was to find precedent for soaking peppers in an alcoholic beverage, as I didn't expect anyone would be mad enough to attempt a mixed drink with this ubiquitous waxen seed-husk... but a bit of interweb sleuthing proved me wrong, oh so wrong. Behold! The Ultimate Bell Pepper Cocktail:


    My initial version used the following:

    • 2 bell pepper rings
    • fresh mint leaves to approximate 1 tablespoon mint
    • 1 1/2 oz. grapefruit juice
    • 1/4 oz. lemon juice
    • 1 1/2 oz. Dogfish Head Blue Hen Vodka
    • 3/4 oz. Galliano liqueur

    In a cocktail shaker, muddle the mint and one bell pepper ring with the grapefruit and lemon juice. Add ice, vodka and liqueur. Shake vigorously. Strain into a cocktail glass, and garnish with bell pepper ring.

    This ended up being far tastier than I expected. The profile of the pepper holds up well with the other flavors, and the result is a sweetly spicy taste of some complexity. Of course, enjoying this requires that one actually likes bell peppers. I offered Laura a sip, and her immediate response was "OMG IT'S HIDEOUS" and to gag and wave her hands in front of her mouth until I brought her a palate-flushing glass of ginger ale.

    The original poster noted that serving such a drink out of a bell pepper seemed to be a messy and inconvenient idea... so I clearly had to go there. Behold! The Epic Ultimate Bell Pepper Cocktail:


    • a whole bell pepper with a relatively balanced bottom
    • fresh mint leaves to approximate 1 tablespoon mint
    • 1 1/2 oz. grapefruit juice
    • 1/4 oz. lemon juice
    • 1 1/2 oz. Dogfish Head Blue Hen Vodka
    • 3/4 oz. Galliano liqueur

    Slice the top off of the pepper in one even layer, and gently core the central seed area out with a paring knife. Cut the central stem out from the top and discard. In a cocktail shaker, muddle the mint and the remaining pepper top with the grapefruit and lemon juice. Add ice, vodka and liqueur. Shake vigorously. Strain into the body of the bell pepper and serve.

    Although admittedly gimmicky, this would be interesting for someone to try who was both "hosting a party" and had a surplus of bell peppers. The added advantage is that cleanup would be both easy and nutritious.

    Now, to finish this alcohol-impregnated pepper...

    Monday, July 26, 2010

    an introduction, and the July 22 raw materials

    Greetings! My name is John, and I'm happy to be on board to share insights and experiences from the Ilchester Road CSA experience. Unlike Adam, this is the first time my wife Laura and myself have been involved with a CSA program, and its been an excellent experience thus far.

    Both of us are employed in jobs that frequently require long and irregular hours - as a result, seeking out fresh produce regularly just doesn't happen. Not only is being a part of this CSA a good thing for supporting local agricultural business, but it's also an incentive for us to expand our culinary horizons beyond "quick, heated dinners" and "eating out." I've been commenting on our experience thus far over at the Gustatory Libation Front, and I look forward to sharing our future (mis)adventures and recipes in this space.

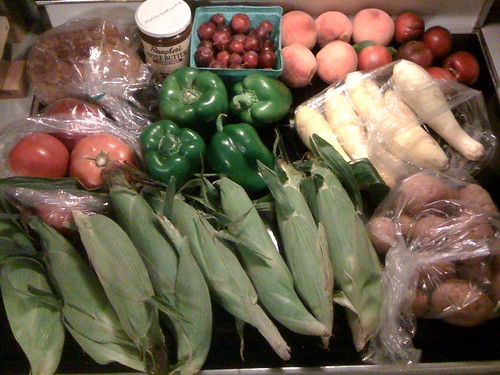
    Speaking of shares, here was this past Thursday's:


    The roll call: bread, tomatoes, apple butter, bell peppers, methley plums, peaches, nectarines, summer squash, red pontiac potatoes, and variegated corn.

    Friday, July 23, 2010

    Raw Veggies for Dipping

    Sometimes the veggies we get each week don't require any prep at all. Katie and I are big fans of snacking, and it's great to use some of our CSA produce for dipping. Here's a hummus recipe that we made recently for a neighborhood party.

    1 large can garbanzo beans (chickpeas)
    1/4 cup tahini sauce (we sometimes use Annie's Goddess Dressing as a substitute)
    2 cloves of garlic
    2-3 tbsp. olive oil
    2-3 tsp. lemon juice
    sprinkle of cayenne pepper

    Above is a recipe for basic hummus. From here you can add any number of things to add flavor. For example, in the picture below we added a chipotle pepper and a handful of cilantro. Other possibilities include any herbs* from Breezy Willow, roasted red peppers, olives, capers, or anything else you have in your pantry or fridge.


    For dipping we use cucumbers, green peppers, onions, pita, or whatever else looks good at the time.

    * herb availability changes from week to week depending on what we are able to harvest on the day of the pickup. If you have any special requests, feel free to e-mail Breezy Willow in advance.

    Wednesday, July 21, 2010

    Vegetable Pot Pie


    This recipe was adapted from a recipe we found on AllRecipes.com. The original recipe can be seen here. We simply changed it to fit our tastes and the veggies we had available at the time. We also used a frozen pie crust instead of making one from scratch.

    Ingredients

    * olive oil
    * onion, chopped
    * garlic, minced
    * potatoes, peeled and diced
    * green beans, trimmed and snapped into 1/2 inch pieces
    * peas, shelled
    * corn (frozen)
    * 3 cups vegetable broth
    * 1 teaspoon salt
    * 1 teaspoon ground black pepper
    * 2 tablespoons cornstarch
    * 2 tablespoons soy sauce
    * 2 frozen pie crusts (one for the top)

    Directions

    1. Preheat oven to 425 degrees F.
    2. Heat oil in a large skillet or saucepan. Cook onions, garlic and potatoes in oil for 3 to 5 minutes, stirring frequently until onions are soft and potatoes are golden brown. Add green beans, peas, corn and vegetable broth. Bring to a boil, then turn heat down to a simmer. Cook until vegetables are barely tender. Season with salt and pepper.
    3. In a small bowl, mix the cornstarch, soy sauce, and 1/4 cup water until cornstarch is completely dissolved. Stir into vegetables, and cook until sauce thickens, almost like a gravy.
    4. Pour the filling into the pastry lined dish. Arrange second crust over the filling, and seal the edges.
    5. Bake for 30 minutes, or until the crust is brown.


    This actually made quite a bit of filling. We made one pot-pie for dinner and froze the rest to use later.

    Tuesday, July 20, 2010

    Summer Fruit

    Since there's only the two of us in our house, sometimes we have to get creative to use up our weekly abundance of fruit.


    blueberries go well on top of almost anything


    We were looking for something new to try with our plums and found this recipe at AllRecipes. The recipe calls for Italian Prune Plums, but I substituted our Methley plums. Halving and pitting was a pain, but the result was delicious.

    Ingredients

    * 6 tablespoons white sugar, divided
    * 1 qt. plums, halved and pitted
    * 3 eggs
    * 1 1/3 cups milk
    * 2/3 cup all-purpose flour
    * 1 1/2 teaspoons grated lemon zest
    * 2 teaspoons vanilla
    * 1 pinch salt
    * 1/2 teaspoon ground cinnamon
    * 2 tablespoons confectioners' sugar

    Directions

    1. Preheat the oven to 375 degrees F (190 degrees C). Butter a 10 inch pie plate, and sprinkle 1 tablespoon of sugar over the bottom.
    2. Arrange the plum halves, cut side down, so that they cover the entire bottom of the pie plate. Sprinkle 2 tablespoons of sugar over the top of the plums. In a blender, combine the remaining 3 tablespoons of sugar, eggs, milk, flour, lemon zest, cinnamon, vanilla, and salt. Process until smooth, about 2 minutes. Pour over the fruit in the pan.
    3. Bake for 50 to 60 minutes in the preheated oven, or until firm and lightly browned. Let stand 5 minutes before slicing. Dust with confectioners' sugar before serving.


    Two other options for using up extra fruit are fruit-water and sangria. Fruit water is really that simple. Slice some fruit and let it soak in a pitcher of water for a few hours.

    Sangria requires a little more work, but there are dozens of variations in the recipe. This is Katie's preferred method:

    Ingredients:

    White or Red Wine (we really like white sangria in the summertime)
    Fruit that is chopped up into smallish pieces (anything from berries to peaches to lemons and limes)
    Brandy (optional)
    Ginger-ale or lemon-lime soda

    Instructions:

    1. Put chopped fruit in a pitcher.
    2. Pour wine into pitcher.
    3. Add a "glug" of brandy.
    4. Add three or four glugs of ginger-ale or lemon-lime soda.
    5. Let sit for one or two hours (if you can stand it...)
    6. Enjoy!

    Note: The amounts are purposefully vague so you can make it with as little or as much wine as you like. Taste as you go and you'll figure out what works.

    As often as we make this, you'd think we'd have a decent picture. Nope, instead I had to find a pic online.

    Cinco de Mayo Recipes. Readers Digest. Web. July 27, 2010.

    What are the favorite ways of using summer fruit at your house?

    Ratatouille


    I think we've reached the point in the summer when no one has any problems using up their weekly share. Stuff like blueberries, plums, corn, tomatoes, etc. are all so common (and so delicious) that it's easy to eat them all without much thought.

    One dish Katie and I really like, and is any easy combination of many of these vegetables is Ratatouille. We have actually made this dish many times without realizing it was a famous, tried-and-true dish. We called it vegetable hodge-podge and thought it was fantastic, and that was it. Browsing through cookbooks or AllRecipes.com shows many variations that are basically the same thing. Some insist on vegetables sauteed separately and then layered like a casserole. We actually prefer to saute everything together in a large wok. It's just easier. Saute vegetables in this order as some require longer to soften:

    Onion
    Garlic
    Squash
    Eggplant
    Tomato

    Amounts vary based on personal taste and the size of the veggies (i.e. 1 large onion = 2-3 smaller onions) Sometimes, depending on what we have available, we'll add mushrooms or green peppers. We just add them in order of hardest to softest so that they cook through. It really is a hodge-podge and I don't think we've ever made it the same way twice. The flavors are such a good mix that we don't use any herbs or spices, maybe just a little salt and pepper at the end.

    Sunday, June 20, 2010

    Fresh Peas

    Growing up I was never a huge fan of peas. Sure, if they were hidden in something like a soup or a chicken pot pie, I would eat them, but I never really liked them on their own. That all changed when I had fresh peas for the first time. Fresh peas are entirely different from their canned or frozen cousins. They are sweet and crunchy and require a little bit of work to earn that reward (although the most difficult thing about shelling peas is keeping up with rouge bouncers). With the recent peas, Katie and I wanted to make something quick and easy where the peas were the main flavor.

    Crushed Peas with Sesame Dressing


    1 1/2 cups peas already shelled or frozen and defrosted
    1/4 cup plain yogurt
    2 tablespoons tahini (sesame seed paste)
    1 tablespoon lemon juice
    2 tablespoons water
    1/4 teaspoon ground cumin
    1/4 teaspoon paprika
    1/4 teaspoon salt
    1 scallions, thinly sliced
    Toasted pitas, cut into wedges, for serving


    Cook peas: Have ready a colander and an ice bath, and bring a medium pot of lightly salted water to a boil. Blanche peas for 30 seconds (if you like them with a real residual snap) to 1 minute (for a slightly more yielding pea) and drain them, then immediately shocking them in the ice water. Drain the peas again and pat them dry on a large towel.


    Crush peas: Using a potato or egg-masher (and hopefully not an annoying one like mine, with holes the exact size of peas!), muddler or meat pounder (be gentle!), lightly crush the peas. Aim for mixed textures, some left whole, most in halves and a few a little more broken up. Put them in a large bowl.

    Make dressing:
    Whisk together tahini, yogurt, lemon juice, water, cumin, paprika and salt. You might be tempted, as I was, to swap the water with olive oil but don’t do it — it makes a horrible curdled mess you will be sad to have to toss.

    Assemble:
    Mix peas with about 3 tablespoons of the dressing, to start, then add more to taste. Sprinkle with scallions. Heap pea mixture on toasted pita wedges.

    Saturday, June 12, 2010

    Roasted Beets with Feta

    Before Katie and I joined the CSA a few years ago, I had never eaten beets. There were definitely other items that were a first for me that summer, but beets stand out just because they don't seem very appetizing to me. I know many people love beets, and I mean no offense, but they just don't look like they'd be any good. But I'm game for trying new things, and I can't stand for anything to go to waste, so we did our best to eat our beets. This is the recipe that we use for our beets.

    Ingredients


    * 4 beets, trimmed, leaving 1 inch of stems attached
    * 1/4 cup minced shallot
    * 2 tablespoons minced fresh parsley
    * 2 tablespoons extra-virgin olive oil
    * 1 tablespoon balsamic vinegar
    * 1 tablespoon red wine vinegar
    * salt and pepper to taste
    * 1/4 to 1/2 cup crumbled feta cheese

    Directions

    1. Preheat oven to 400 degrees F (200 degrees C). Wrap each beet individually in aluminum foil, and place onto a baking sheet.
    2. Bake beets in preheated oven until easily pierced with a fork, 45 minutes to 1 hour. Once done, remove from oven, and allow to cool until you can handle them. Peel beets, and cut into 1/4 inch slices.
    3. While the beets are roasting, whisk together shallot, parsley, olive oil, balsamic vinegar, and red wine vinegar in a bowl until blended; season to taste with salt and pepper, and set aside.
    4. To assemble the dish, place the warm, sliced beets onto a serving dish, pour vinaigrette over the beets, and sprinkle with feta cheese before serving.


    I can't say that I now love beets, and I don't really ever crave them, but they're pretty good every once in a while. How do you like your beets?

    Saturday, June 5, 2010

    Ripe Strawberries


    Happy first week of CSA!

    Adam and I were really excited to meet everyone on Thursday. Unfortunately, we've had a busy few days and forgot about our wonderful strawberries. When we went to eat them this morning they were on the verge of being too ripe, so we decided to make them into muffins! Here is the recipe we used:

    Muffin Ingredients

    • 1 cup rolled oats
    • 1 cup milk or half and half or soymilk (whatever you have in the house)
    • 1 small single-serving container of strawberry yogurt
    • 1 cup all-purpose flour
    • 1 teaspoon baking powder
    • 1/2 teaspoon baking soda
    • 1 teaspoon salt
    • 1 egg
    • 1/4 cup vegetable oil
    • 3/4 cup brown sugar
    • 1 teaspoon vanilla
    • 1 cup chopped fresh strawberries

    Directions

    1. Preheat oven to 375 degrees F (190 degrees C). Grease and flour a muffin pan, or use paper liners. In a small bowl, combine oats, yogurt and milk, and let stand 5 minutes. In a medium bowl, combine flour, baking powder, baking soda and salt; set aside.
    2. In a large bowl, beat together the egg, oil, brown sugar and vanilla. Blend in the oat mixture. Stir in the flour mixture, just until moistened. Fold in strawberries. (I also threw in some chocolate chips) Fill muffin cups 2/3 to 3/4 full.
    3. Bake in the preheated oven for 15 to 20 minutes, or until a toothpick inserted into the center comes out clean.

    Icing

    This icing recipe is really easy. When I worked at the Blue Moon Cafe in Fell's Point, we would whip this stuff up and drizzle it over our freshly baked cinnamon rolls. Yum. Anyway, we mostly made it by feel, so there aren't any specific measurements. Just go with it!


    Ingredients
    • Milk or half and half or soymilk
    • vanilla
    • powdered sugar
    • cornstarch (if you want it thicker)
    Directions
    1. Put a handful of powdered sugar in a bowl.
    2. Add a touch of vanilla (maybe a teaspoon?)
    3. Add a glug of milk.
    4. Stir until it is a smooth creamy consistency.
    5. Spoon it over your warm muffins.
    I also shaved a chocolate bar and sprinkled the shavings on top of the muffins. Hope you enjoy them!


    What did you guys do with your strawberries? Or anything else for that matter? Share with us in the comments.
    And FYI, this is a community blog, so anyone who wants to post is more than welcome. Share your recipes and thoughts about the CSA or food in general! Just email adam_yeargin @ hcpss.org for an account. Thanks and see you all on Thursday.

    Monday, May 3, 2010

    Heirloom Tomatoes

    This week we got some heirloom grape tomatoes. Not only were they beautiful, they were the most delicious tomatoes I can ever remember eating. They would have been great on a salad, a pizza, or any other dish, but they didn’t last an hour after getting home. These tomatoes didn’t stand a chance.

    * Taken from an earlier blog post

    Monday, April 19, 2010

    Eggs!


    The egg on the right is a cage-free, store-bought, egg. The egg on the left is a locally grown, naturally raised, cage-free, no hormones, antibiotics, etc. The difference is obvious in the picture and even more so in-person. It says a lot about how farming habits affect our food, and consequently affect our health. You won’t believe the difference in taste until you try it.

    * Taken from an earlier blog post

    What's This All About, Anyway?

    One of my favorite things my wife and I have done in recent years is to join a CSA. CSA stands for Community Supported Agriculture and is basically a group of people who buy into a local farm, or in our case, a group of farms. Katie and I had wanted to join one for some time, but it wasn’t until we met R.J. Caulder at the Maryland Sheep and Wool Festival that we had an opportunity. In addition to making all-natural, hand-crafted soaps and body products, R.J. and her family run the Breezy Willow CSA and Katie and I have been members for a few years now. We commit to a subscription fee and every week we get to go to the farm and pick up a supply of fruits, vegetables, and occasionally dairy products. All of it is grown locally using organic and/or sustainable farming methods.

    The season begins in May/June (depending on the weather) with asparagus, strawberries, and other early harvest vegetables and ends around late October with squash, apples, pears, etc. We get 24 weeks of locally grown produce filling our kitchen and it's awesome. It's basically a surprise each week when we go to the farm and an unexpected benefit is that it is forcing us to cook many things we may never have bought on our own. The first year we joined was my first time to have ever eaten beets, turnips, parsnips, and a few others that I can't remember.

    Here's a picture of one week's pick-up. I don’t have a date on this photo, but I know it was a pick-up from late fall.


    From left to right: fresh milled bread, tomatoes, beets, brussels sprouts, broccoli, pears, red apples, green apples, Romanesco broccoli, carrots, turnips, and red cabbage. (the onions and butternut squash are left over from a previous week)

    This is typical of the amount of food we get each week, and we're pretty good about using it all just in time for the next week's pick-up. The items change each week based on what’s being harvested at the time. I'm very excited that Tiffany and Donna have worked to bring this opportunity to our school community. I'm proud to support local, independent farmers and I love eating healthy foods grown in a responsible, natural way.

    * Parts taken from an earlier blog post

    Welcome!

    Welcome to the Ilchester Road CSA blog. This blog was designed for members of the Ilchester Elementary School/Bonnie Branch Middle School CSA pickup through Breezy Willow Farm. Everyone is welcome to join and encouraged to contribute. We’re really hoping to use this to foster the “community” aspect of this CSA. In addition to supporting local farmers, we wanted a place for community members themselves to gather. Here we can share recipes and other experiences related to the CSA. Just to get things jump-started, I’ve copied and pasted a few blog entries from my personal blog.